無料で自動更新が可能なSSL/TLSサーバー証明書 ”Let’s Encrypt” 、既に本番運用中のサーバーから、別のサーバーに引っ越しするにはどうすればよいでしょうか。
そもそも Let’s Encrypt はどのようにして証明書発行を行っているのか、その仕組みを理解しておきましょう。Let’s Encrypt が発行する証明書はドメインの所有名義を認証するDV証明書のみです。証明書が置かれるサーバーがそのドメインを管理下に置いていることが証明できればドメインの正当性が確保でき、Let’s Encryptは証明書を発行できるのです。
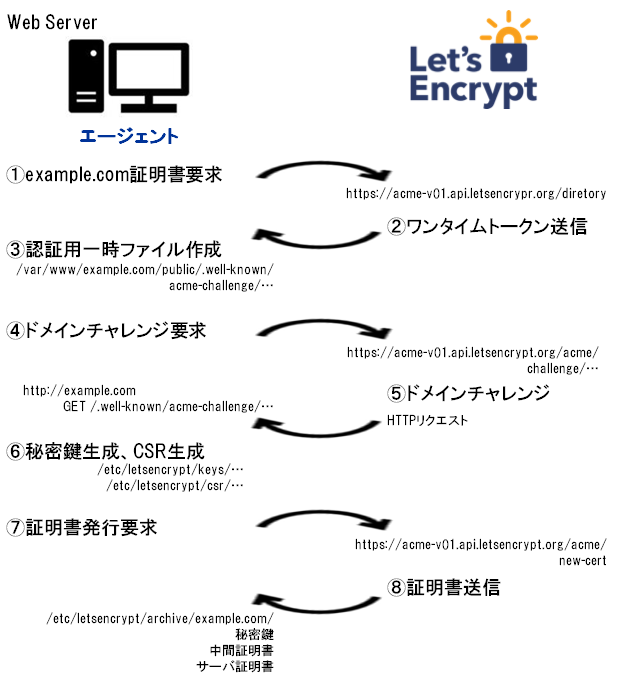
SSL証明書の発行プロセス
Let’s Encrypt のクライアントプログラムCertbotを実行すると、次にようなプロセスで証明書の発行が行われます。
SSL証明書の保存先
Certbotが取得した証明書一式は以下のディレクトリに保存されます。
/etc/letsencrypt
|-- accounts             # アカウント情報
|   |-- acme-staging.api.letsencrypt.org
|   |   `-- …
|   `-- acme-v01.api.letsencrypt.org
|   |   `-- …
|-- archive
|   `-- example.com      # 取得した証明書の実体
|       |-- cert….pem
|       |-- chain….pem
|       |-- fullchain….pem
|       `-- privkey….pem
|-- csr
|   |-- …_csr-certbot.pem
|-- keys
|   |-- …_key-certbot.pem
|-- live
|   `-- example.com      # 最新の証明書へのシンボリックリンク
|       |-- cert.pem -> ../../archive/example.com/cert….pem
|       |-- chain.pem -> ../../archive/example.com/chain….pem
|       |-- fullchain.pem -> ../../archive/example.com/fullchain….pem
|       `-- privkey.pem -> ../../archive/example.com/privkey….pem
|-- options-ssl-apache.conf
`-- renewal              # 証明書の更新用設定ファイル
    `-- example.com.conf
エージェントが認可されたキーペアを手に入れれば、認可されたキーペアで署名した証明書管理メッセージを送信することにより、証明書の取得、更新、失効の手続きを簡単に行うことができるのです。
証明書を更新する場合は、”certbot-auto renew” を実行するだけです。これで新しい証明書への入れ替えが行われます。証明書の入れ替え処理では archiveディレクトリに新しい証明書が保存され、liveディレクトリのシンボリックリンクが新しい証明書ファイルに変更されます。
SSL証明書の移転
さて、ここからが本題です。別のサーバーに移転する方法です。
証明書の失効手続きを行ってから、改めて新しいサーバー上でインストールと証明書発行という方法も考えられますが、ここでは、旧サーバーから引き継ぐ方法を考えてみます。
/etc/letsencrypt ディレクトリ配下にアカウント情報、証明書一式、設定ファイルが保存されているのですから、このディレクトリを丸ごと移転することにより、移転先の新サーバーでも引き続き使用できると見てよさそうです。
新サーバーへのインストール
前提条件
CentOS 7.3
nginx/1.10.2
Let’s Encrypt ユーザーガイドに従ってCertbotクライアントをインストールします。
sudo yum install epel-release
sudo yum install certbot
Apacheプラグインを使用する場合は
sudo yum install python-certbot-apache
インストール直後の証明書保存先は以下のようにディレクトリのみ作成されています。
/etc/letsencrypt
|-- accounts
|   `-- acme-v01.api.letsencrypt.org
|       `-- directory
`-- options-ssl-apache.conf
旧サーバーの証明書一式をバックアップ
移転元の旧サーバーでzip圧縮して保存
cd /etc
zip -r letsencrypt.zip letsencrypt
新サーバーにリストア
letsencrypt.zipを旧サーバーから新サーバーに転送してからzipファイルを解凍
cd /etc
unzip letsencrypt.zip
zip圧縮する際にシンボリックリンクオプションを付けなかったため、シンボリックリンクが実ファイルとして復元されてしまいました。
旧サーバーと同じシンボリックリンクを作成します。
cd /etc/letsencrypt/live/example.com
ln -s ../../archive/example.com/cert3.pem cert.pem
ln -s ../../archive/example.com/chain3.pem chain.pem
ln -s ../../archive/example.com/fullchain3.pem fullchain.pem
ln -s ../../archive/example.com/privkey3.pem privkey.pem
証明書更新コマンドを実行してみます。
certbot renew
Saving debug log to /var/log/letsencrypt/letsencrypt.log

-------------------------------------------------------------------------------
Processing /etc/letsencrypt/renewal/example.com.conf
-------------------------------------------------------------------------------
Attempting to parse the version 0.13.0 renewal configuration file found at /etc/letsencrypt/renewal/example.com.conf with version 0.12.0 of Certbot. This might not work.
Cert not yet due for renewal

The following certs are not due for renewal yet:
 /etc/letsencrypt/live/example.com/fullchain.pem (skipped)
No renewals were attempted.
更新期限前のため更新処理がスキップされました。更新が可能となるのは前回更新から60日経過後です。
シミュレーションコマンドはどうでしょうか。
certbot renew --dry-run
Saving debug log to /var/log/letsencrypt/letsencrypt.log

-------------------------------------------------------------------------------
new certificate deployed without reload, fullchain is
/etc/letsencrypt/live/example.com/fullchain.pem
-------------------------------------------------------------------------------

-------------------------------------------------------------------------------
Processing /etc/letsencrypt/renewal/example.com.conf
-------------------------------------------------------------------------------
Attempting to parse the version 0.13.0 renewal configuration file found at /etc/letsencrypt/renewal/example.com.conf with version 0.12.0 of Certbot. This might not work.
Cert not due for renewal, but simulating renewal for dry run
Starting new HTTPS connection (1): acme-staging.api.letsencrypt.org
Renewing an existing certificate
Performing the following challenges:
http-01 challenge for example.com
Waiting for verification...
Cleaning up challenges
Generating key (2048 bits): /etc/letsencrypt/keys/0037_key-certbot.pem
Creating CSR: /etc/letsencrypt/csr/0037_csr-certbot.pem

-------------------------------------------------------------------------------
new certificate deployed without reload, fullchain is
/etc/letsencrypt/live/example.com/fullchain.pem
-------------------------------------------------------------------------------
** DRY RUN: simulating 'certbot renew' close to cert expiry
** (The test certificates below have not been saved.)

Congratulations, all renewals succeeded. The following certs have been renewed:
 /etc/letsencrypt/live/example.com/fullchain.pem (success)
** DRY RUN: simulating 'certbot renew' close to cert expiry
** (The test certificates above have not been saved.)
こちらは成功しています。
自動更新設定
クーロンに更新コマンドを設定し自動更新する設定をします。コマンドの実行結果はメールで確認できるようにしてみます。
メール送信サーバーの設定
メール送信サーバーをインストールします。
yum -y install postfix
メール送信サーバーをスタートします。自動起動の設定もしておきます。
systemctl start postfix
systemctl enable postfix
デフォルトMTA (メール送信エージェント) を確認しておきます。
alternatives --display mta
リンクは現在 /usr/sbin/sendmail.sendmail を指しています。
が出力された場合は、以下のコマンドでMTAをpostfixに切り替えます。
alternatives --config mta
選択 コマンド
-----------------------------------------------
*+ 1 /usr/sbin/sendmail.sendmail
 2 /usr/sbin/sendmail.postfix

Enter を押して現在の選択 [+] を保持するか、選択番号を入力します:2
確認します。
/etc/alternatives/mta
lrwxrwxrwx 1 root root 26 x月 xx xx:xx /etc/alternatives/mta -> /usr/sbin/sendmail.postfix
メール送信サーバーの設定
vim /etc/postfix/main.cf
設定例
# サーバーのホスト名
myhostname = example.com
# 使用ドメインを指定
mydomain = example.com
# 送信元メールアドレスのドメイン指定
myorigin = $mydomain
# 何処からでも接続可能に変更
inet_interfaces = all
# 何処宛のメールを処理するサーバか宣言
mydestination = localhost.$mydomain, localhost
# メールボックスの場所設定
home_mailbox = Maildir/
# サーバのバージョンを隠す設定
smtpd_banner = $myhostname ESMTP unknown
# SMTP認証を有効化
smtpd_sasl_auth_enable = yes
# SASL 認証 realm を指定。saslpasswd2 の -u で指定したものと同じ値
smtpd_sasl_local_domain = $mydomain
# 送信時の制限
#   - 自分の環境からは許可
#   - SMTP認証済みは許可
#   - SMTP認証失敗は拒否
smtpd_recipient_restrictions =
	permit_mynetworks,
	permit_sasl_authenticated,
	reject_unauth_destination

minimal_backoff_time = 60s
maximal_backoff_time = 600s
maximal_queue_lifetime = 1800s
bounce_queue_lifetime = 1800s
queue_run_delay = 60s
vim /etc/postfix/master.cf
# 587番ポート使用の宣言
submission inet n - n - - smtpd
 # 587番を利用したメール送信はSMTP認証が必要
 -o smtpd_sasl_auth_enable=yes
 # SMTP認証に失敗した送信は拒否する
 -o smtpd_client_restrictions=permit_sasl_authenticated,reject
SMTP認証で利用する cyrus SASLライブラリをインストールします。
yum install cyrus-sasl-md5 cyrus-sasl-plain
cyrus SASL のパスワードを設定します。
saslpasswd2 -c -u example.com ユーザー名
password: パスワード
chown postfix /etc/sasldb2
cyrus SASLの認証方法をパスワードファイル利用に変更しておきます。
vim /etc/sasl2/smtpd.conf
pwcheck_method: auxprop
mech_list: cram-md5 digest-md5 plain login
saslauthd は起動しません。
systemctl stop saslauthd
systemctl disable saslauthd
mailxコマンドをインストールします。
yum install -y mailx
シミュレーションコマンドの実行結果をメール送信してみましょう。
certbot renew --dry-run 2>&1 | mail -s 'Lets Encrypt updated' mymail@example.com
クーロン設定
2か月おきに1日 22:00起動で証明書の更新とWEBサービスの再起動を設定します。
crontab -u root -e
0 22 1 */2 * certbot renew 2>&1 | mail -s 'Lets Encrypt updated' mymail@example.com && systemctl restart nginx
SSL証明書の失効手続き
最後に、SSL証明書の失効手続き方法です。
これもコマンドが用意されています。
certbot revoke --cert-path /etc/letsencrypt/live/example.com/cert.pem
サーバー移転先への Let’s Encrypt 移行とSSL証明書更新の完全自動化まで行いました。更新を忘れていて失効ということはなく、2か月おきの更新の結果はメールで確認できます。
コメント
[…] サーバー移転(引越し)でLet’s Encrypt 「SSL/TLSサーバ証明書」はどうする? […]
[…] 方針やコマンド等は下記を参考にさせていただいた。 http://www.ubuntu-perl-web.com/blog/20200619081050.html https://blog.fileshelfplus.com/vps/280 […]